Tonight we decided to go back to basics and build yet another clock project for the Raspberry Pi, using the Adafruit 7 Segment Display.
We offer these displays in Red or Green!
 |
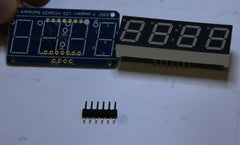
In the package, you get a 7 segment display with 4 positions, as well as the "I2C backpack". The "I2C backpack" is a micro-controller that basically allows your Raspberry Pi to tell the display what to do. Without the I2C backpack, the display simply would not work. |
||
 |
|
||
|
On the first go around, we made a bit of a mistake. We got a little cocky and did not read Adafruit's directions on how to build the 7 segment display. Turns out we soldered the display in upside down! Not a big deal since we have 20 of these things in stock, but for most people it would be a show stopper. Very important: make sure the decimal points on the board line up with the decimal points on the display. The soldering directions will show you the way! |
||
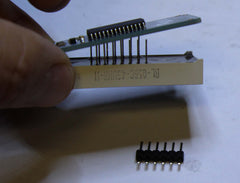 |
Carefully align all the pins when you slide the display onto the board. You might have to bend a pin or two to get them aligned, that is OK. We recommend soldering the display to the board prior to soldering the header pins. Another thing we learned on the second try! |
||

|
Next, solder the head pins to the board, and you will end up with something looking like this. Note that they might give you 6 pins, and you have to cut 2 of them off prior to soldering. |
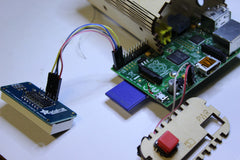 |
For our application, we decided to connect the LED directly to the Pi. This is one of our workhorse Pi's that we use to create SD cards, and we'd like it to have a clock so we can keep track of time! In terms of wiring, we connected Ground to GND, 3.3V to VCC, Pin 8 to SDA, and Pin 9 to SCL
A couple things to note here! 1) Check out the beautiful Engrained Products case 2) We added a reset button by following this tutorial |
Now we are in the home stretch! All we have to do is configure our Pi to run the 7 segment LED.
Please note that we are starting with the latest version of Raspbian.
 |
First things first, you want to install Git. Git is a repository for code, and it is super handy for obtaining ready to use open-source code. We are installing Git so we can download code directly from our friends at Adafruit. Type sudo apt-get install git When it prompts you if you want to continue, hit "Y" |
 |
Next, "clone" the Adafruit repository by typing: git clone https://github.com/adafruit/Adafruit-Raspberry-Pi-Python-Code.git Note: Python is the programming language we are using here. We won't get into details on it for now, but it is easy to use and very powerful. |
 |
Next, you want to edit the file /etc/modules to look like the file at the left. Basically we are enabling the I2C backpack on the display to function. We will use the "nano" editor to make the changes type: sudo nano /etc/modules Then add i2c-bcm2708 and on the next line, i2c-dev Hit Control-X to save |
 |
Now we will modify a file called modprobe.d Type: sudo nano /etc/modprobe.d/raspi-blacklist.conf For some reason, the default install assumes we may not want to use I2C. Since in this case we do, we "comment out" the lines of code that "blacklist" I2C and SPI. Simply add a # ("hash" or "pound sign") in front of the lines as shown at left Then hit CONTROL-X to save |
Now with any luck, everything should work!
Reboot your Pi so the configuration changes can take effect. Do this by typing sudo reboot
Once you're running, type: cd Adafruit-Raspberry-Pi-Python-Code/Adafruit_LEDBackpack/
Then, hold your breath and type: sudo python ex_7segment_clock.py
With any luck, you will get something like this:

Well, we hope you get a chance to try out this project. It is a quick and fun project!
Comments will be approved before showing up.


Johna953
May 01, 2014
A big thank you for your article.Thanks Again. Great. gfgegdgbdgge