


micro:bit V2
by Newark
SKU CED-C1392
Micro:bit V2 brings a whole host of new onboard features and tech upgrades whilst keeping all the things students, teachers and makers love about the original. This means the new micro:bit will be compatible with all the existing lessons, code and most add-on boards.
Here is a summary of the features:
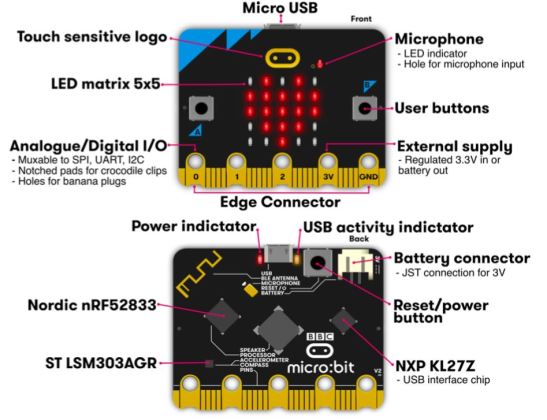

One of the big features the community have wanted on the micro: bit is now here: an onboard speaker! Gone are the days of connecting headphones or wiring up a speaker to create music with your micro:bit! The new onboard speaker on the back of the micro:bit V2 provides a great platform for getting started with the music functionality in MakeCode and Python. Making sound and music is one of the first truly creative things children and teachers do with technology in the classroom, so the addition of a built-in speaker was a natural next step for the foundation.
Using the speaker within MakeCode and Python is super simple. All you have to do is enable the onboard speaker for all the music commands within your editor of choice, and use the music functionality like you would if you had an external speaker attached.
The second major upgrade is the onboard Knowles MEMs microphone sensor. This enables the new micro:bit to respond to sound by execute code depending on the level of sound. Just like the speaker, the microphone is placed on the back of the board and can be identified by a small gold rectangle. We tested the microphone by creating a simple project that would play some music with the onboard speaker when the microphone detected a clap.
Paired to the microphone is an LED which shines through the board illuminating a microphone icon. Every time the microphone is listening, the LED will turn on. We think this is a really nice touch! The LED is also a great way to teach about the importance of privacy and the impact listening devices have on our lives.
In addition to the two buttons as input devices on the micro:bit, there's now another type of input in the form of the micro:bit logo! On the original micro:bit, the micro:bit "face" logo was the same colour as the triangles, but now on V2, the micro:bit logo is a copper capacitive touch button that can be used as an input device just like the two buttons.
The logo touch functionality can be used just like the buttons in MakeCode, with on logo pressed and on logo released blocks to execute code on the touch of the logo.
{"one"=>"Select 2 or 3 items to compare", "other"=>"{{ count }} of 3 items selected"}