Greetings! This is Elisa Shoenberger, the novice maker, and I’m going to learn how to program an Arduino. I’m going to learn from scratch how to make one do my bidding. It will be excellent. I’ve had limited experience coding. The last time I coded anything was in middle school when I “learned” html. Before that I made very basic graphics on my Apple ][E. So yeah.
So this is my Arduino. It’s name is Franklin as in Aretha Franklin. Cause I’m going to make it sing…sort of. It’s an older arduino: a DC Boarduino Kit v1.0 from Adafruit. I first put it together in 2010 but then it didn’t work. And it sat for years. All I knew was that there might be a problem with the soldering job. But after some helpful troubleshooting from my fellow hackers last week, it now works! And it was the soldering. It just needed a little bit more tender love and care with a soldering gun.

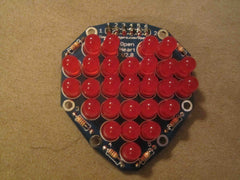
I have also this LED heart that I made four years ago too. I’ve always wanted to make it sparkle…well as much as you can with LED lights. So my goal is to make my LED heart glow. It's called Open Heart Vo2, a Charlieplexed LED array, by Jimmie P Rogers. And then I’m going to do some amazing things with the LED lights like a light up fedora. My dreams.

Here we go!
So the first thing I did was go to http://arduino.cc/, I clicked the “Learning” tab, chose “Getting Started”, and selected the one for Mac OSX. The instructions were rather straightforward.
First, I connected my arduino to my computer using the cord. One end is a USB port and the other is a serial port. It’s handy that the cord has multi-colored cords coming off of it. The arduino has one side of the serial port marked “Grn” for Green and the other side it is “Blk” for “Black.” This helps in directing you on how to correctly connect the board to the computer. I matched the green cord to part of the arduino marked “Grn” and the black cord to "Blk."
Second, I downloaded the Arduino environment. There’s a link to download it. I installed it and opened it up. This is where you can program your arduino to do stuff. And what marvelous plans I have for it. ::insert evil laugh here::
Third, I had to download some additional drivers since my arduino is old. There is a link to the FTDI website. It was a little confusing at first to figure out what to download but I figured out that you stay on the page that you land, and download the version relevant to your computer. I installed it and restarted my computer.
Fourth, I have to tell the environment what kind of arduino I have. This was a bit tricky because my arduino is old. I checked out the Lady Ada website for its Boarduino. It told me that the board would be called “Diecimila/Duemilanove with 328P.” The number corresponds to the chip and is often written on the arduino itself. In the arduino environment, I clicked on “Tools”, chose “Board”, and selected the recommended Board. Then I had to chose the correct serial port. The Arduino CC website recommended “/dev/tty.usbserial” since it is a Mac and an older board.
Fifth, Arduino website recommended that I start with “Blink.” It’s a very basic program that makes the little red light on the arduino turn off and on. I copied and pasted the code from the website into the Arduino environment. Then I hit the tiny arrow at the top to download the program on my arduino. While it downloaded, the red light started to blink super fast. This meant that it was processing. And then it started to blink, on and off, for 1000 milliseconds. To make sure that it wasn’t purely a “Copy and Paste” job, I changed the code so the light blinked on for 500 seconds and then off for 500 seconds. It’s a real bona fide start.

Phase one is complete. Next will be the programming of the heart.
That’s all for now!


